Step 1: Access the Regulatory Matrix for Editing
-
Click Account Settings in the upper right corner of the screen.
-
Click Settings.
-
Click Assign Requirements.
-
Select the facility whose requirements you would like to update.
-
Click the Assign Requirements button.


You will now be viewing the Regulatory Matrix for the selected facility.

Step 2: Set or Update Applicability
-
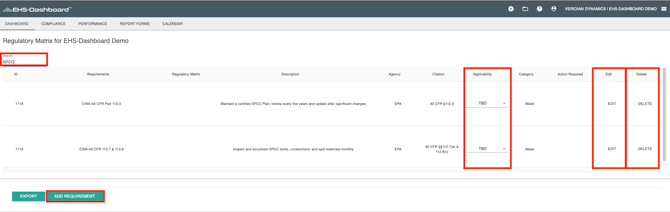
Locate the requirement you would like to review or update.
-
Use the dropdown menu in the Applicability column to select Applicable or Not Applicable.
-
Use the search bar to quickly find specific requirements.
Tip: Clicking on a column header will sort the table, which can be helpful when reviewing multiple requirements.
Changes to Applicability are saved automatically. Once your selections are made, you may simply navigate away from the page.
When a requirement is marked Applicable, it becomes part of your active compliance program and will appear in the Compliance section of the system.

Step 3: Understand the Action Required Button
For certain requirements, selecting Applicable will display an Action Required button.

While this button allows you to create a pre-seeded Action Item from this screen, it is recommended that you instead follow the instructions in the How to Associate Calendar Task with a Requirement help document. That process provides greater flexibility and supports a more complete compliance tracking workflow.
Step 4: Add a Custom Requirement (Optional)
-
Scroll to the bottom of the Regulatory Matrix page.
-
Click Add Requirement.

3. Enter the required information.
 4. Save the new requirement.
The new requirement will then be available for Applicability selection and compliance tracking.
Step 5: Edit or Delete an Individual Requirement
-
To edit or delete an individual requirement use the search bar to locate the requirement.
-
Click Edit to modify the requirement details.
-
Click Delete if you need to remove the requirement.

Step 6: Edit or Delete Requirements in Bulk
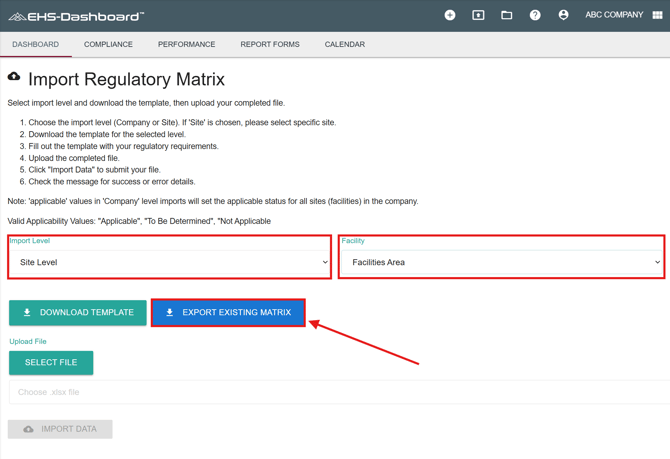
If you need to update multiple requirements at once, you can export the matrix, make changes offline, and re-import the file.
Export the Existing Matrix
-
Click Account Settings in the upper right corner.
-
Click Settings.
-
Then click on Organization & Compliance -> select Import Regulatory Matrix.

4. Choose the Import Level and Facility you would like to update.
5. Click the Export Existing Matrix button
Edit the Matrix Offline
-
Open the exported file in Excel or another compatible spreadsheet program.
-
Update Applicability, modify existing entries, or add new requirements as needed.
NOTE: Please keep all column headers and IDs exactly as they appear in the exported file. The system relies on these fields to map the data correctly during import.
Re-Import the Updated Matrix
-
Save the updated file.
-
Return to the Import Regulatory Matrix page.
-
Upload your revised file.
-
Complete the import process.
The system will apply your updates while maintaining consistency across company and site requirements.
All requirements marked Applicable can be viewed and managed in the Compliance area by selecting Compliance from the top navigation menu.
Outcome
After completing this guide, you will be able to access your facility’s Regulatory Matrix, accurately set requirement applicability, add or edit requirements, and perform bulk updates to ensure your compliance program reflects your current operational needs.