You can set up Custom Forms to collect data for a variety of different purposes. You can create as many forms as necessary to collect, track, and analyze data for your organization.
Each form you create must fall under one of the following functional categories, but the form naming convention is flexible. We've included some common examples for each category below:
- CALENDAR ITEM: Forms classified as Calendar Items are added to your EHS-Dashboard™ Calendar. You can have many different "types" of Calendar Items such as:
- Audits, Inspections, EHS-Task, Compliance Task, etc.
- Audits, Inspections, EHS-Task, Compliance Task, etc.
- CORRECTIVE ACTION: Forms classified as Corrective Actions are added to your EHS-Dashboard™ Calendar. Corrective Actions support an Approval & Root Cause analysis workflow. This feature distinguishes them from regular Calendar Items.
- Examples: Incident Investigation CAPA, Inspection CAPA, etc.
- Examples: Incident Investigation CAPA, Inspection CAPA, etc.
- REPORT: Forms classified as Reports are added to your Report Forms log. Reports are not required to have a due date and do not show up on your Calendar. You can have many different "types" of Reports such as:
- Incident Report, Incident Investigation, Work Request, Ergonomic Assessment, etc.
- Incident Report, Incident Investigation, Work Request, Ergonomic Assessment, etc.
- RISK ASSESSMENT: Forms classified as Risk Assessments are added to your Report Forms log. Risk Assessments are not required to have a due date. Risk Assessments allow you to:
- Identify hazards and risk factors that have the potential to cause harm (hazard identification).
- Analyze and evaluate the risk associated with that hazard (risk analysis, and risk evaluation).
1. Click on the company icon in the top right corner of the page:
2. Click "Custom Forms" in the Admin menu:

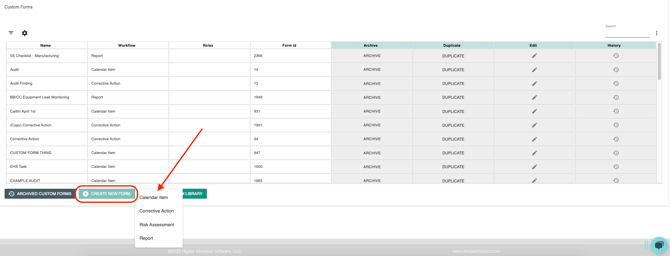
3. To create a new form, click the "Create New Form" button in the lower left of the page, then select the type of form you're creating (Calendar Item, Corrective Action, Report, Risk Assessment):
4. On the following configuration page you will be able to set up your new form in accordance with your needs.
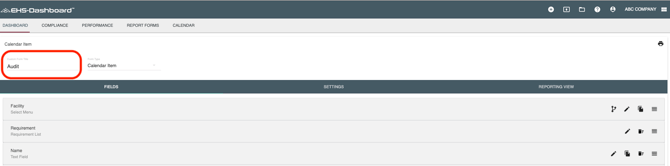
One tip, Be sure to give your form a unique name. This name is how you will identify all submissions of the same form type in the system. In reporting views you can sort them by name to view specifically "Audit", for example:
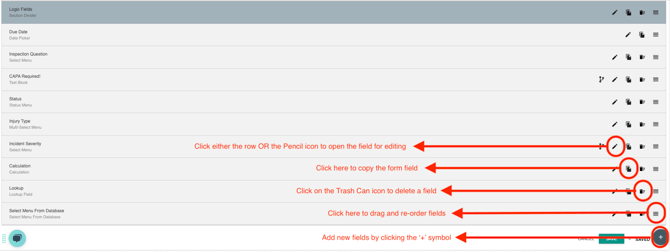
5. You also have the ability as a user to organize your form fields. You can drag and drop any row to re-order form fields, add new fields, or delete unnecessary fields from the form. Make sure to click “Save” in the bottom right hand corner of the page before exiting:
6. Congratulations! You have created a new Custom Form Template! Learn more about manipulating your Custom Forms via additional help docs found here.
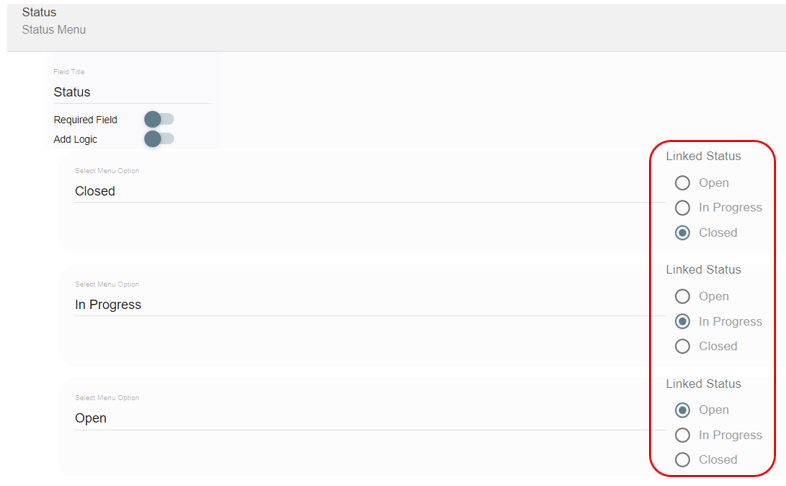
*NOTE: If one of the form fields is the 'Status', the menu's linked status must be selected before saving and closing the form.